
Abstract
- Email routing is the process of directing emails from a sender to the intended recipient’s inbox. It involves a series of rules that ensure emails reach the correct destination
Security
Filter spam and potentially harmful emails.
Email distribution to corresponding category
Manages a high volume of emails, sorting them into different inboxes for customer support, sales, marketing, etc.
Privacy
Creates custom addresses without revealing your primary email.
Flexibility
We have the freedom to switch the destination email providers and use our custom domain name to receive emails without paying a fee
Whitelist sender emails in Gmail
If you are routing emails to Gmail inbox, some senders may be blocked. You can refer to here to whitelist those emails.
Email Routing Mechanism
- We set the MX Record of Domain Name to point to the Email Routing server. So when a sender sends an email to the domain name, the email routing server is able to receive and apply the routing rules and forward to the destination email inbox if all rules are met
Cloudflare Email Routing
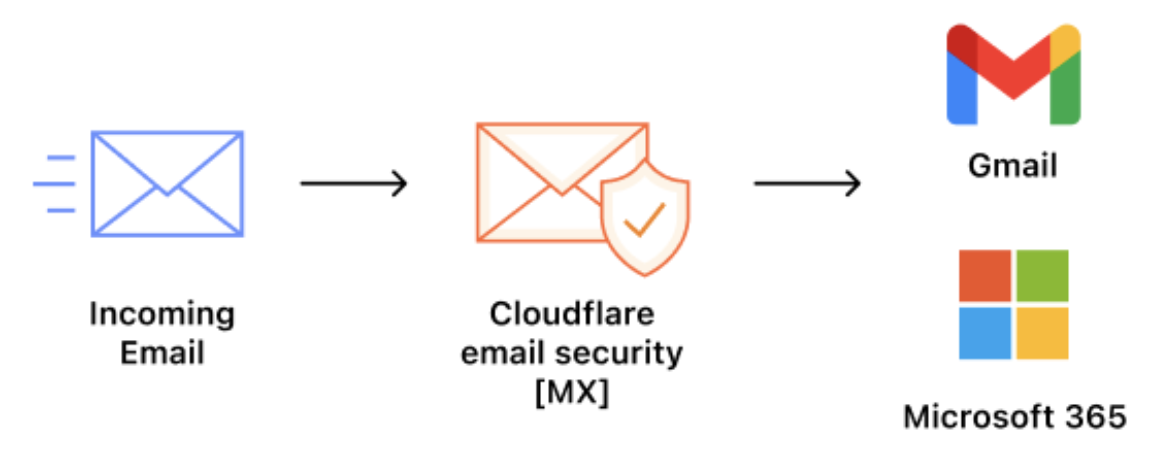
- Cloudflare’s offering for Email Routing. Refer to Cloudflare Email Routing docs for setup guide
Free!!!
It is totally to free to use. Comes with free Custom domain support and Routing Analytics!
However, there is a message limit of 25MB, 200 email routing rules and 200 destination emails. Refer to Cloudflare Email Routing Limits for more details.
Attention
Each custom address can only have one routing rule. You will get a ‘Duplicated Zone rule’ error if you try to create another.
If you are using Terraform to create the routing rule, the
valueinactionis an array. However, you should only input a single email string. If you provide multiple strings in the array, Cloudflare will concatenate them into one.
Process emails programmatically
Route to Cloudflare Workers to program any logic you can dream of for processing your emails.
Cloudflare Email Worker
- A custom script built using Cloudflare Workers that allows developers to process, forward, or manage emails directly within the Cloudflare network. It enables flexible and serverless email handling, such as filtering, parsing, or routing emails to different destinations based on specific rules
- Refer to Cloudflare Email Workers for more details
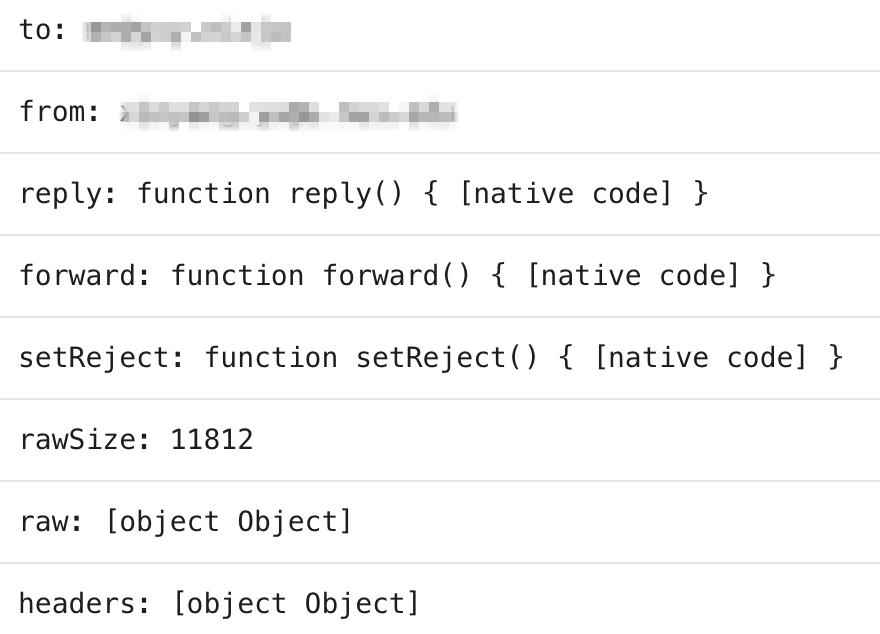
Worker parameters
You can access the environment variables of the email worker via the
envparameter. The screenshot above shows the structure of themessageparameter.
Worker observability
We are able to collect logs of the worker now! For more details, refer to Cloudflare worker logs.
Use Gmail to Send Emails with Your Custom Domain
1. Generate a Google App Password
- Go to Google App Passwords.
- Sign in with your Google account.
- Type a name (e.g.,
CustomDomainMail) and click Create. - Copy the generated 16-character app password. Keep it safe, you’ll need this when configuring Gmail to send emails with your custom domain name.
2. Configure Gmail to Send with Your Custom Domain
- Open Gmail → click the gear icon → See all settings.
- Go to the Accounts and Import tab.
- Under Send mail as, click Add another email address.
- Enter:
- Name: Your display name (e.g., pretty_email_xinyang)
- Email address:
you@yourdomain.com - Don’t need to tick Treat as an alias, because we are using Cloudflare Email Routing to control which email inbox we are are sending the emails to. More more information on alias, checkout the official docs
- Click Next Step.
- Enter the SMTP details:
- SMTP Server:
smtp.gmail.com - Port: 587 (TLS/STARTTLS) or 465 (SSL if 587 doesn’t work)
- Username: your full Gmail address (
yourname@gmail.com) - Password: the 16-digit App Password you generated
- SMTP Server:
- Click Add Account.
- Gmail sends a verification email to
you@yourdomain.com(forwarded to your Gmail inbox). - Open it → click the link or enter the code.
3. Verify Your “Reply From” Settings
To avoid leaking your Gmail address:
- In Accounts and Import, under When replying to a message, select:
- Reply from the same address the message was sent to.
- Now, if someone emails
you@yourdomain.com, Gmail automatically replies asyou@yourdomain.com.
4. Set Up Email Authentication (Fix Outlook “Unverified”)
- Even if sending works, Outlook and other providers may show your emails as Unverified unless you configure SPF, DKIM, and DMARC. These authenticate your domain and improve deliverability
Setting up DKIM
One option is to use Google Workspace which costs money.
Another option is to use an SMTP relay with DKIM like SendGrid, Mailgun, Postmark, AWS SES, SMTP2GO which come with a free plan. Setup steps:
- Sign up and add
your_domainas a sending domain.- They’ll give you DKIM TXT records to add in Cloudflare.
- Update Gmail “Send mail as” (step 6) → use their SMTP server instead of
smtp.gmail.com.- Emails will be signed with DKIM and pass DMARC.
I recommend going with Postmark since it’s built for transactional emails. Unlike bulk senders, it doesn’t do heavy batching or long queueing, and because they manually vet accounts to keep spammers out, its reputation with inbox providers is much stronger. Plus, you get 100 free emails per month.
You can also integrate Postmark with Datadog for a more detailed analysts view.
5. Test Your Setup
- Send an email to mail-tester.com.
- Confirm SPF, DKIM, and DMARC all PASS.
- Re-send to Outlook → the Unverified label should not appear.